UPDATE: there is now a one touch search solution for Windows PC users, written by fellow MX Revolution fan, virtual.
Read on for the Apple Mac solution…
After nearly 12 years using the amazing Logitech MX Revolution mouse, it finally began to die. Replacing it with the Logitech MX Master mouse, I found that it didn’t have one of my favourite features – ‘one touch search’. My solution will also work with the MX Master 2s and MX Master 3 mice – as well as other multi-button Logitech mice like the MX Anywhere 2.
How it used to work
Select some text, press the ‘One-touch search’ button, and you would get a search for the selected text in your favourite browser and search engine. I used that button dozens of times a day.
But in the Logitech Options software, there is no longer an option for this, and you get the anaemic ‘Lookup’ command or, worse, an option to do a spotlight search.
I searched high and low on the internet, but no one had come up with a solution, and Logitech are unaccountably dragging their feet on this issue. But by combining an Automator service with the Keyboard shortcut action in Logi Options, I’ve got a working solution!
Here’s the solution:
- Create a ‘search selection’ service in Automator
- Assign it a keyboard shortcut in System Preferences
- Assign that keyboard shortcut to the button in Logi Options
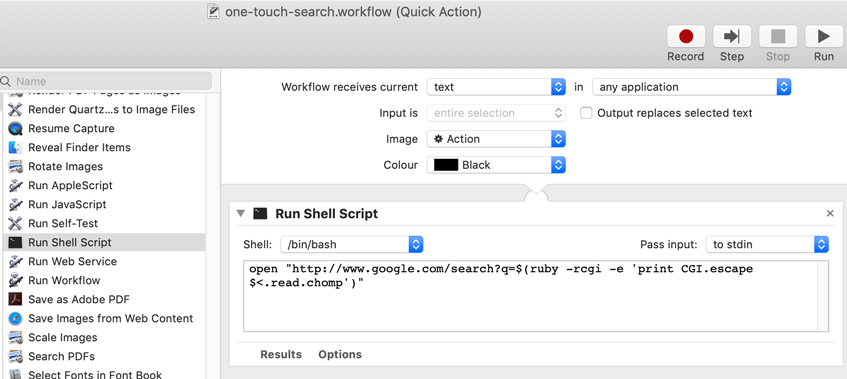
First step – make a ‘search selected text service’ in Automator

- Open Automator and make a New>Quick Action
- Add a Run Shell Script action, and paste this into the shell script window:
open "http://www.google.com/search?q=$(ruby -rcgi -e 'print CGI.escape $<.read.chomp')"Hat tip: Lri - Save the service
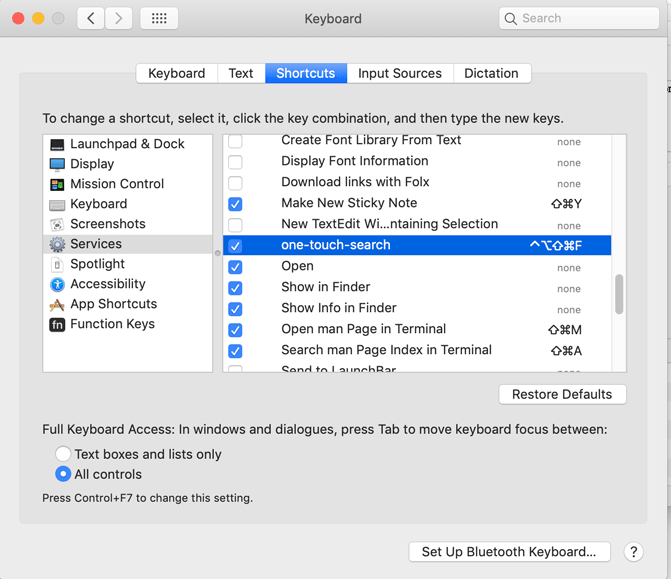
Next: assign a keyboard shortcut to the service in System Preferences

- Go to System Preferences>Keyboard>Services
- Find the new Service you created in the Automator steps above – it will be under the ‘Text’ heading
- Make a new keyboard shortcut for this Service – I used the rather complicated Ctrl+Cmd+Opt+Shift+F because I didn’t want it to clash with any other shortcuts and I won’t actually be typing it by hand.
Now you’re ready for the final step!
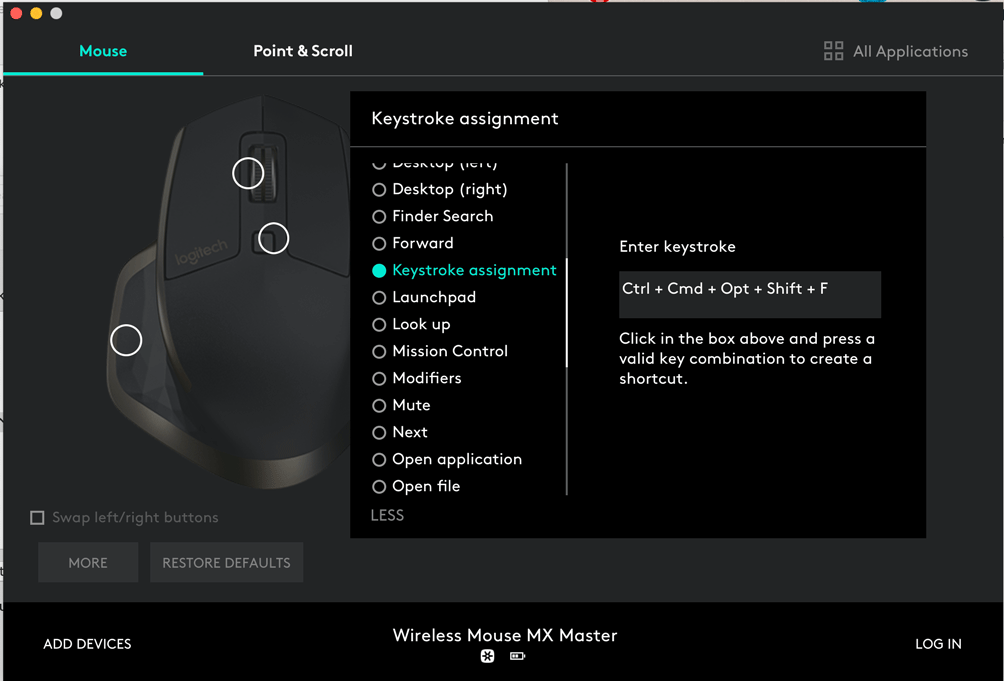
Add your shortcut as a ‘Keystroke Assignment’ in Logitech Options.

- Select the button you want to use
- Choose ‘Keystroke Assignment’ as the function of that button
- Add the keystroke you created in System Preferences
You’re done! Enjoy your upgraded MX Master mouse!